Written By: Michiel Froling
Last Updated on March 16, 2024
Creating an incident
If an incident occurs, this always has to be reported and tracked. This is easily done via the AirHub Drone Operation Center. There are two ways to add an incident, here you’ll read about both options.
Drone Operation Center
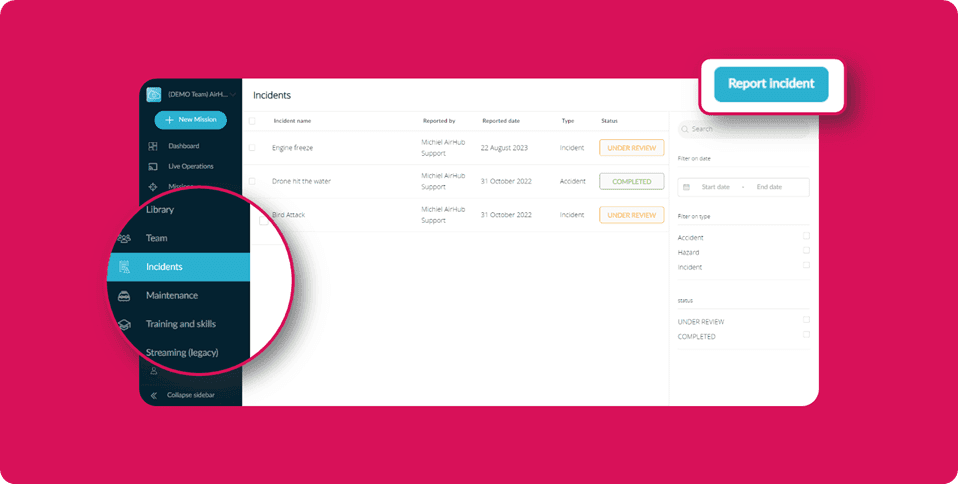
Add an incident in the overview of the incidents:
Select ‘Incident’ from the left menu on the main screen.
You’ll be directed to a screen that provides an overview of all reported incidents.
In the upper right corner of the screen, you’ll see a blue button labeled ‘Report Incident.’ Click on this button.
A new screen will open, prompting you to fill in the required information, including:
Select the type of incident (e.g., ‘Incident,’ ‘Accident,’ or ‘Hazard’).
Fill in the title (mandatory).
Add a description of the incident (optional).
Search for and select the flight on which the incident occurred (mandatory).
Choose the flight phase (optional).
Add the name of the investigator (optional).
Select the status (mandatory).
Add any necessary documents (optional).
Always be sure to click on the “Save” button to save your incident report.
Your incident will automatically be added to the overview of reported incidents. You can also find the incident in your logbook on the selected flight.
Add an incident directly to the flight:
To add an incident to a flight in the AirHub Drone Operation Center, follow these steps:
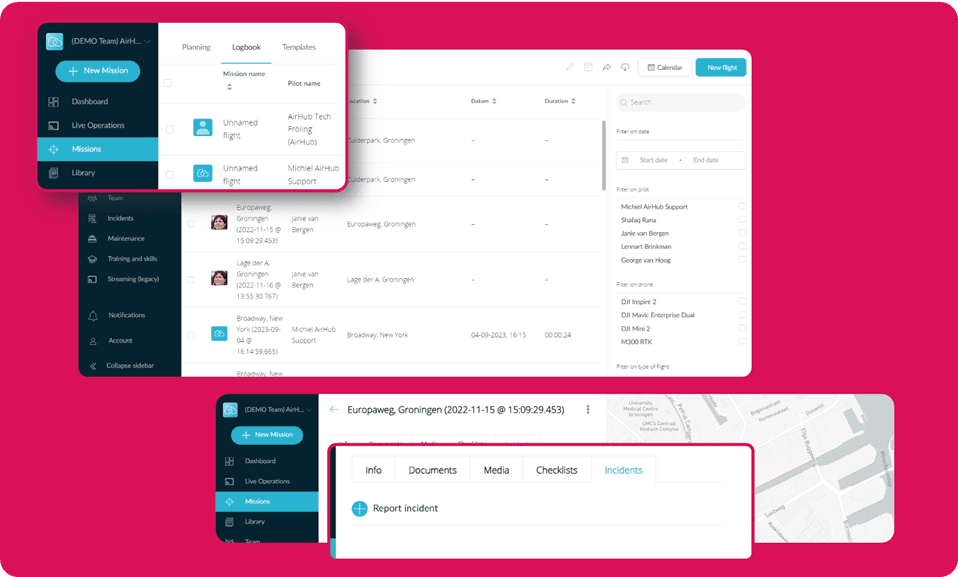
Go to the “Mission” tab from the left menu.
Select “Logbook” from the top menu. You will be taken to a screen that provides an overview of all executed flights.
Click on the flight to which you’d like to add the incident.
On the flight page, navigate to the last tab, which is dedicated to incidents. Click on this tab, and you will see an option to “Report Incident.” Click on this option.
A new screen will open, prompting you to fill in the required information for the incident, including:
Select the type of incident (e.g., ‘Incident,’ ‘Accident,’ or ‘Hazard’).
Fill in the title (mandatory).
Add a description of the incident (optional).
Search for and select the flight on which the incident occurred (mandatory).
Choose the flight phase (optional).
Add the name of the investigator (optional).
Select the status (mandatory).
Attach any necessary documents (optional).
Always ensure to click on the “Save” button to save the incident report.
Your incident has been successfully added to the flight. To access this incident, as well as view all other incidents, you can navigate to the overview of incidents by clicking on ‘Incidents’ in the left sidebar of the screen. This provides an easy way to review and manage all incident reports in one place.
Downloading the incident report document (PDF):
Go to “Manage” and select “Incidents.”
Select the incident that you want to download.
Select the three-dot icon.
Select “Print (PDF),” and a separate window will appear where you can continue to print or download the report in PDF format.
If the window doesn’t appear automatically, select the blue “Print” button to show the print window manually.