Written By: Michiel Froling
Last Updated on February 23, 2023
Map layers
In the flyzones map, you have the option to enable different map layers, which can provide valuable information about the area where you plan to fly. These layers offer insights into various aspects of the location, and you can even switch between UTM providers for specific locations.
Drone Operation Center
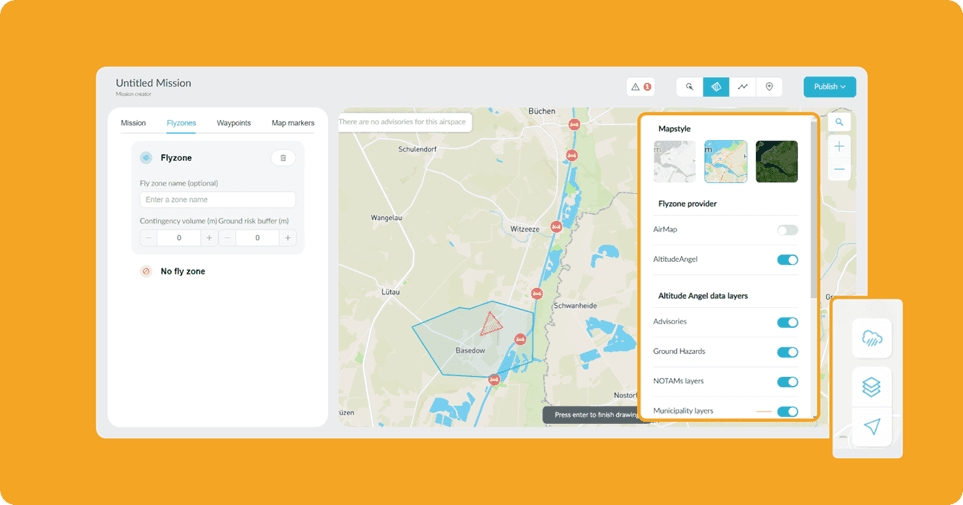
Create a new mission by clicking the “New Mission” button in the top-left menu of the Drone Operation Center or by going to the “Mission” tab in the left menu and clicking the “New Flight” button on the Mission page.
You will be redirected to the New Mission page for flight planning.
On the map, in the bottom-left corner, you’ll see several icons. Click on the second icon from the top; this is the layers icon.
A drop-down menu will appear, allowing you to choose between different map styles and flyzone providers, such as AirMap or Altitude Angel.
Select the desired data layers that you want to display on the map. These layers can provide information such as airspace restrictions, ground hazards, and more. Each layer may have a specific purpose or set of information.
By enabling these map layers, you can gain a better understanding of the conditions and restrictions in the area where you plan to fly your drone. This information can be crucial for safe and compliant flight planning.
Advisories: layer that shows area specific advisories and warnings
Gound Hazards: layer that show any obstacle on ground that could affect drone flight
NOTAMs layers: layers that show temporary messages created to communicate when something different or special is happening in the airspace
Municipality layers: layers that show where the land border is
Waterways layers: layers that show where all rivers are located
Railroads layers: layers that show where all railroads are located
Wind turbines layers: layers that show where all wind turbines are located
Bridges layers: layers that show where all bridges are located
Power lines layers: layers that show where all power lines are located
Road layers: layers that show where all roads are located
Select the map layers you’d like to see on your map
Custom Map Layer
Adding Custom Map Layer
Go to your Drone Operations Center (DOC).
Open your Admin Workspace.
Select “Manage”.
Go to “Organization”.
Select “Custom Map Layer”.
Select “New” and upload your files by selecting either “Upload GEOJson” or “Upload KML”.
Hiding/Showing Custom Map Layer
Once you have uploaded and set your custom map layer, go to “Live Operations”.
Select the layers icon on the lower right side of your screen.
Select “Map Layers”.
Find the map layer you want to show and select the toggle button to turn it on (i.e., it has turned blue).
To hide the map layer, find the particular map layer and select the toggle button to turn it off (i.e., it has turned grey).
Adjusting Custom Map Layer
You can adjust your map layer by changing the following:
The name of the map layer
Changing the color shown on the map
To make some adjustments, go to “Custom Map Layer” under “Organizations”.
Find the map layer that you want to adjust.
If you want to adjust the color, click the color square and choose your preferred color.
If you want to adjust the name, click on the three dots and select “Edit”. Adjust the name and click “Save”.
Removing Custom Map Layer
To remove the map layer from the system, go to “Custom Map Layer” under “Organizations”.
Find the map layer you want to remove, click on the three dots, and select “Delete”.
A pop-up window will appear. Select “Delete”. Please remember that once you have done this, all data from this map layer will be removed and cannot be recovered.
Ground Control IOS App

Map layers in the Ground Control App function similarly to those in the Drone Operation Center. These layers provide valuable information when planning your drone flights.
Go to the flyzones page within the app.
On the right side of the screen, you’ll find a button with a layers icon.
Click on this button to access map styles and map layers.
Select the specific map style and map layers you want to view on your flyzones map.
Ground Control Android App
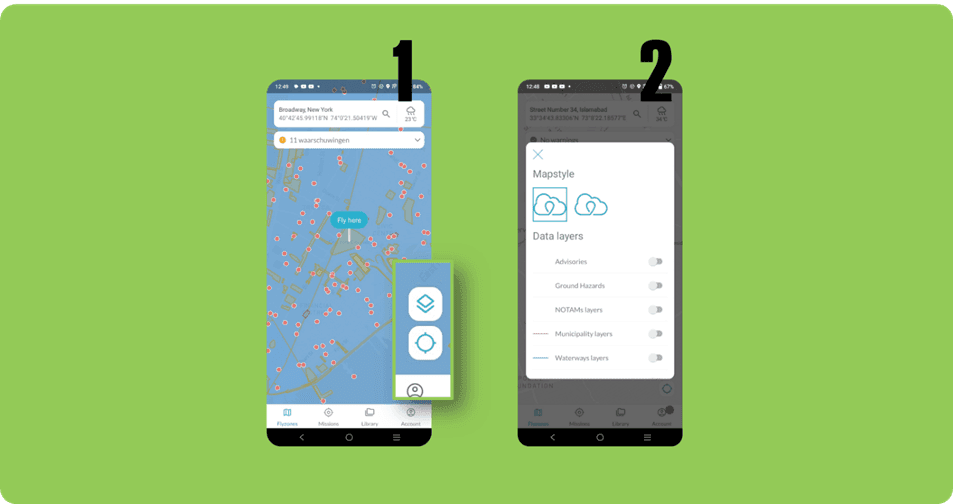
The process for accessing map layers in the Android app is similar to that in the IOS and Drone Operation Center.
Navigate to the flyzones page within the app.
On the right menu of the screen, you’ll see a button with a layers icon.
Click on this button to open the map styles and map layers menu.
Choose the map style and map layers you wish to display on your flyzones map.