Executing a Mission in AirHub – Cockpit
Before you start:
Ensure your drone and battery are connected and recognised by AirHub. You can start a mission directly in the app or load one from the Planning section.
1.1 Getting Started with a Mission
Open the AirHub app.
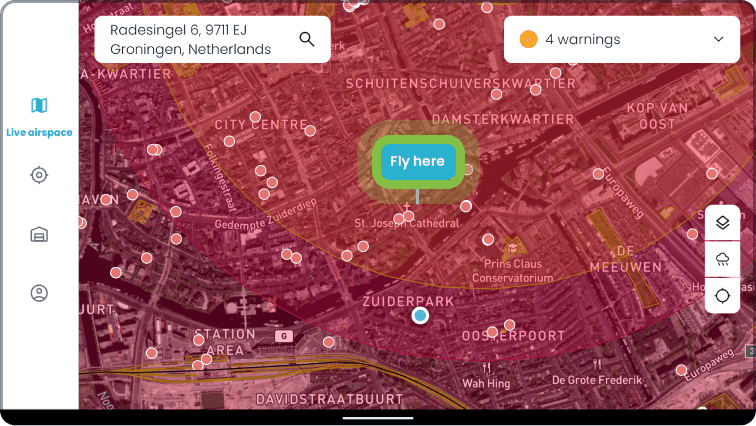
To create a new mission, press Fly Here.
This generates a new flight plan where you can set mission objectives and define flight parameters.
Alternatively, open a pre-planned mission from the Missions section.
1.2 Starting Your Flight
Once your mission is ready, press Start Flight.
AirHub will automatically detect the connected drone and battery, reducing setup time.
Review mission parameters and confirm readiness before takeoff.

1.3 Entering AirHub – Cockpit
From the main menu, select AirHub – Cockpit.
The Cockpit interface is your central hub for flight control, providing real-time telemetry, mission monitoring, and intuitive controls.
You are now ready to commence your mission.

1.4 AirHub Cockpit Overview
Once inside the Cockpit, you’ll see a real-time operational dashboard that helps ensure safe and efficient flights. Features include:
Live telemetry (altitude, speed, position).
Mission monitoring.
Camera and livestream controls.
Battery and system status.
Safety checklists.
This interface serves as the primary tool for managing and executing drone missions seamlessly.
1.5 Cockpit Interface Explained
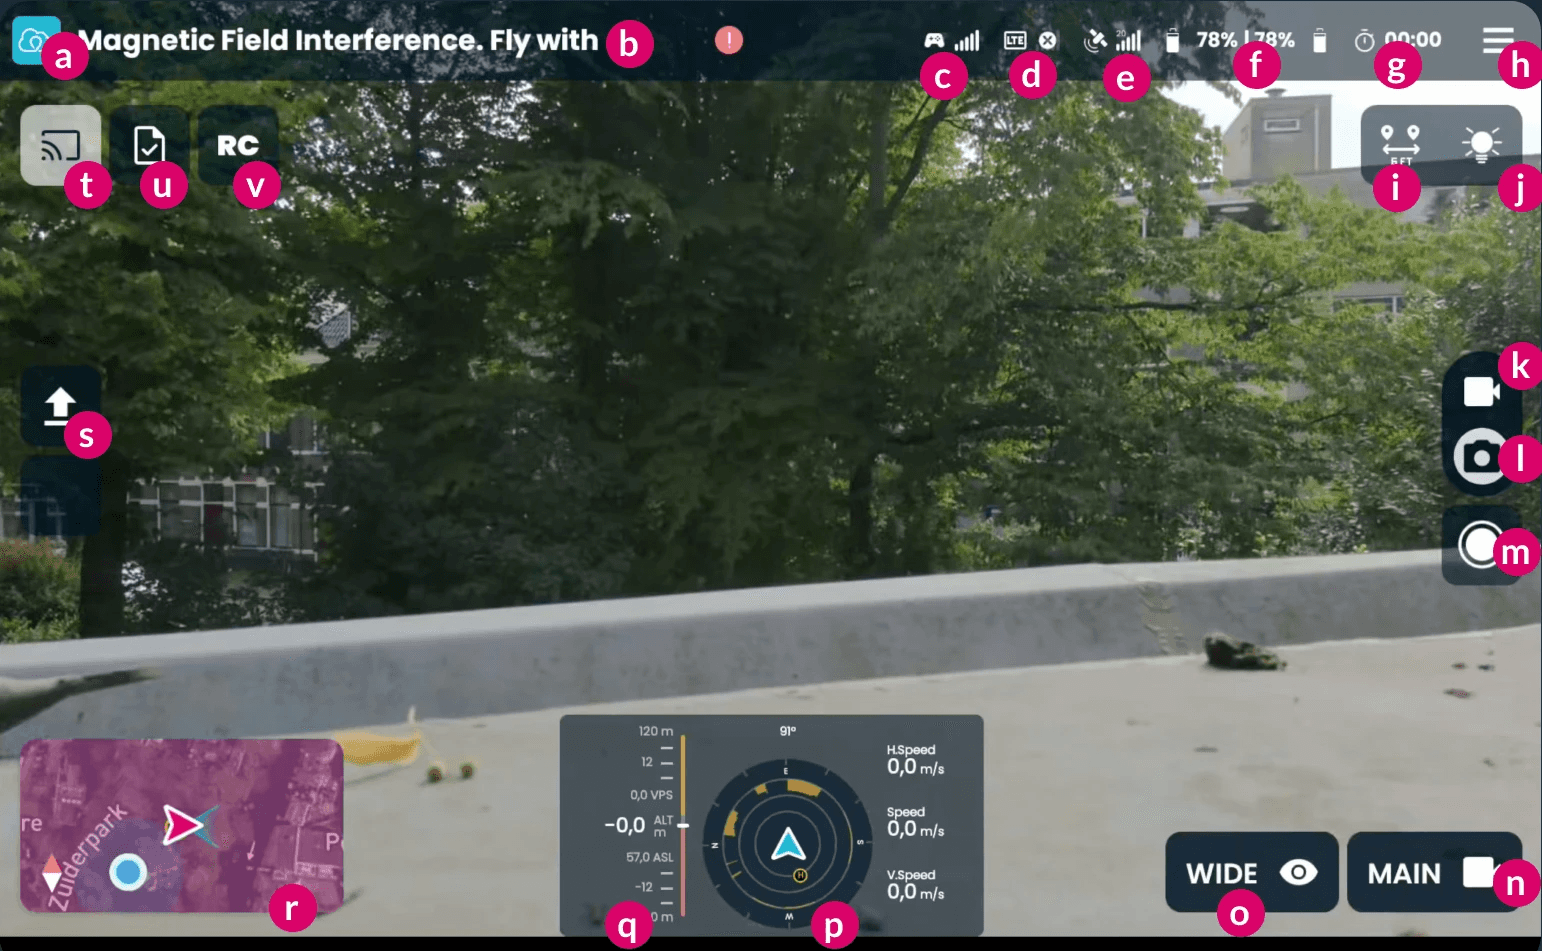
Legend of functions in the Cockpit:
a. Exit Cockpit Mode: Leaves the flight view, allowing you to log or abort the flight.
b. Aircraft Status: Displays the drone's current operational state and system health (e.g., "Ready to Fly," "In-Flight").
c. RC Link Quality: Shows the signal strength between the remote controller and the aircraft. It is displayed with mobile data-like bars.
d. LTE Connection: Displays the strength of the drone's cellular (LTE) network connection. It will show the link quality in bars.
e. GPS Quality: Indicates the strength of the GPS signal and the number of connected satellites.
f. Battery Status: Shows the remaining battery life as a percentage.
g. Remaining Flight Time: An in-flight estimate of the remaining time the drone can fly.
h. Settings Menu: Access advanced settings and configurations for the drone.
i. Laser Rangefinder: Measures the distance to an object; can optionally place a marker on the map at the measured location.
j. Lights: Toggles the drone's auxiliary lights on or off.
k. Video Mode: Switches the capture function to video recording mode.
l. Photo Mode: Switches the capture function to still photography mode.
m. Capture Button: Starts/stops video recording or takes a picture, based on the selected mode.
n. Switch Camera: Toggles between the different cameras on the drone (e.g., visual, thermal).
o. Switch Camera Lens: Changes the active lens on the current camera (e.g., wide, zoom).
p. Telemetry widget: A display showing the proximity of nearby obstacles and speed in different axii.
q. Altitude Indicator: Displays the drone's current altitude, optionally showing data from vertical (upward and downward) sensors.
r. Map View: Shows the drone's location, fly zones, and map markers. Tap to enlarge to full-screen.
s. Flight Action Button: A context-sensitive button that displays "Take Off," "Land," or "Return to Home (RTH)" based on the drone's status. t. Livestreaming: Toggles the live video feed to the Drone Operations Center.
t. Livestream: Press this to enable livestreaming. It will become a lighter colour when enabled.
u. Checklists: Accesses in-flight safety and operational checklists.
v. Direct Flight Control: Toggles control access, allowing a remote user in the Drone Operations Center to pilot the aircraft.
1.6 What Happens Next
Once in Cockpit, all flight data and mission parameters are tracked automatically.
Any recorded media (photos or videos) will be saved to the app and linked to your mission.
Logs and telemetry are stored for compliance and review after the flight.
1.7 Next Steps
Familiarize yourself with each Cockpit function before your first live mission.
Always review checklists before takeoff to ensure safe operations.
Use the livestream toggle to share mission video with your team in real time.
Related articles